Dimhaven – The Lost Source gives you very little hand-holding, and that is part of the charm. But a few puzzles in this game are genuinely tricky, because the clues are ambiguous, the notation is unusual, or the answer depends on sounds you have to match by ear. This guide covers the hardest ones and explains the logic behind each solution.
What we cover:
| Puzzle | Location | Core Challenge |
|---|---|---|
| Visa Survey Machine | Landing Bay | Wire socket swapping |
| Toolbox Code | Landing Bay | Sequence is upside-down |
| Ambassadorial Lavatory Padlock | Landing Bay | Date math formula |
| Filing Cabinet (Code 1403) | Landing Bay / Visa Office | City name fragment matching |
| Visa Typewriter | Landing Bay / Visa Office | Perforated ticket decoding |
| Workshop Dial (Vosh Dial) | Kishvar | Base numbers + arrow direction |
| Circuit A – CMP Units | Kishvar | Placement rules from manual |
| Circuit B – Wrench Puzzle | Kishvar | Coordinate notation decoding |
| Fuse Box (Hotel Sarkany) | Kishvar | Rotation diagram + wire plug |
| Kitchen Cabinet Circuit | Zack’s Mansion | Open/closed binary logic |
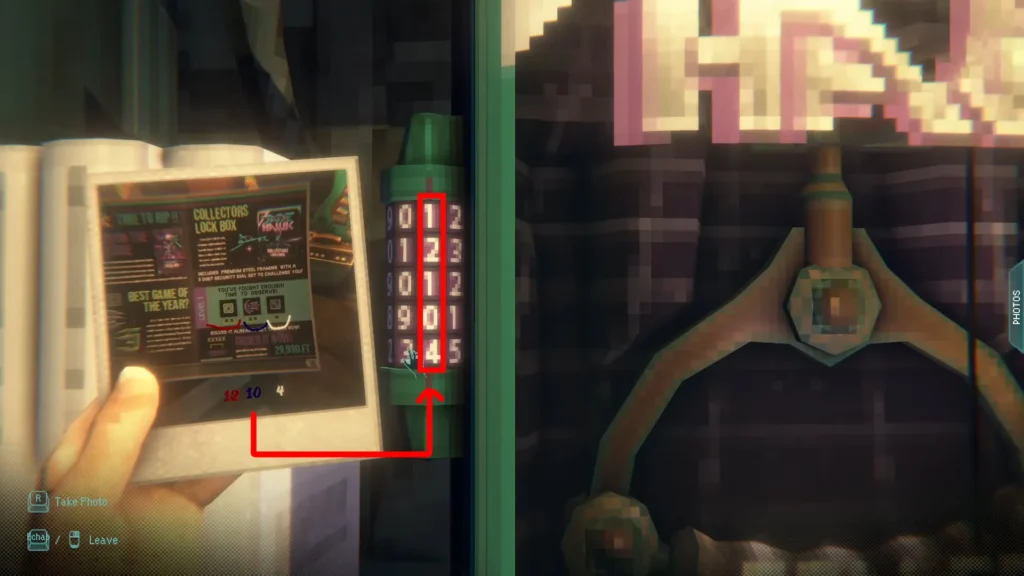
| JadeHawk Game – Collector’s Box | Zack’s Mansion | Count enemies, don’t die |
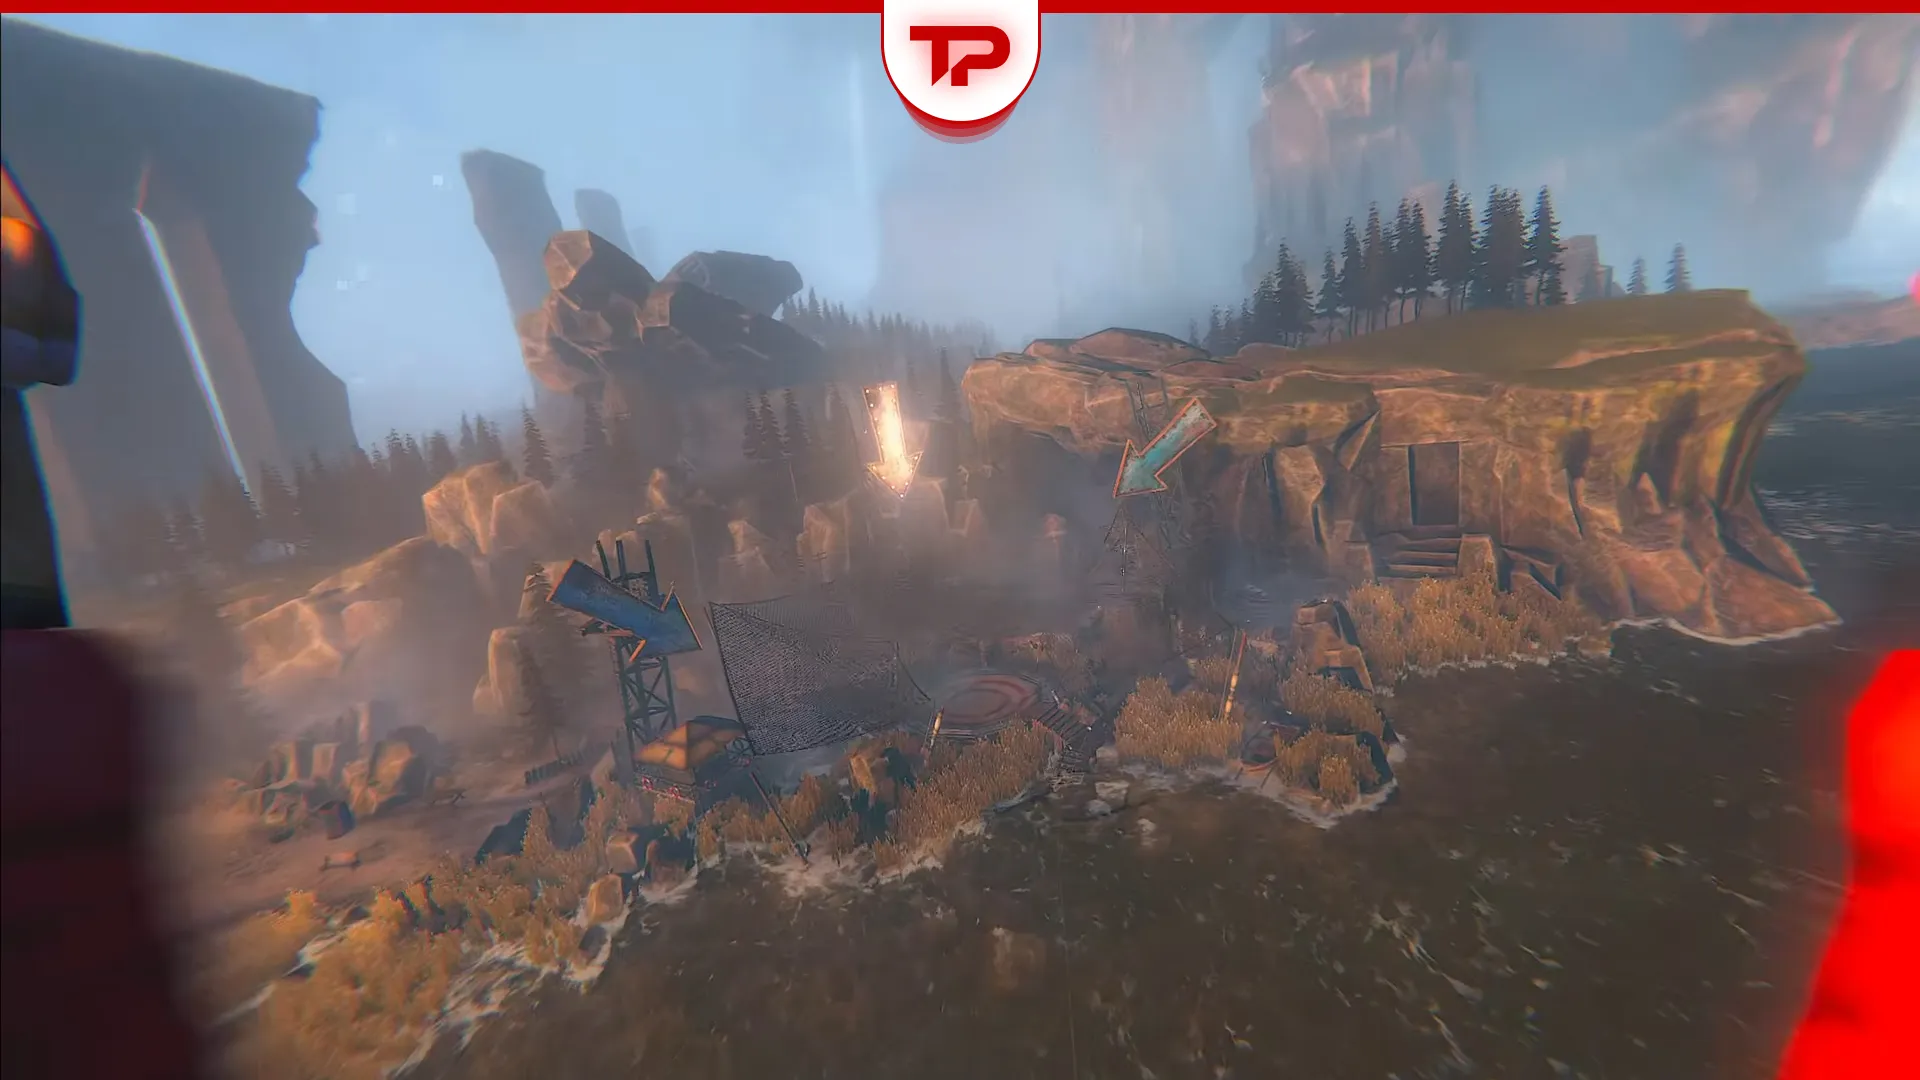
Landing Bay Puzzles
The first section of the game is about getting through the visa process and gaining access to Kishvar. Several of the puzzles here require you to cross-reference documents scattered around the Visa Office, so read everything and photograph every notice on the walls before you start solving.
Visa Survey Machine
When you first land on Dimhaven, a mandatory survey booth blocks your path. Only the leftmost button works at first, but after completing the survey once, you can open a panel which is under the buttons and move the wire to one of three sockets.
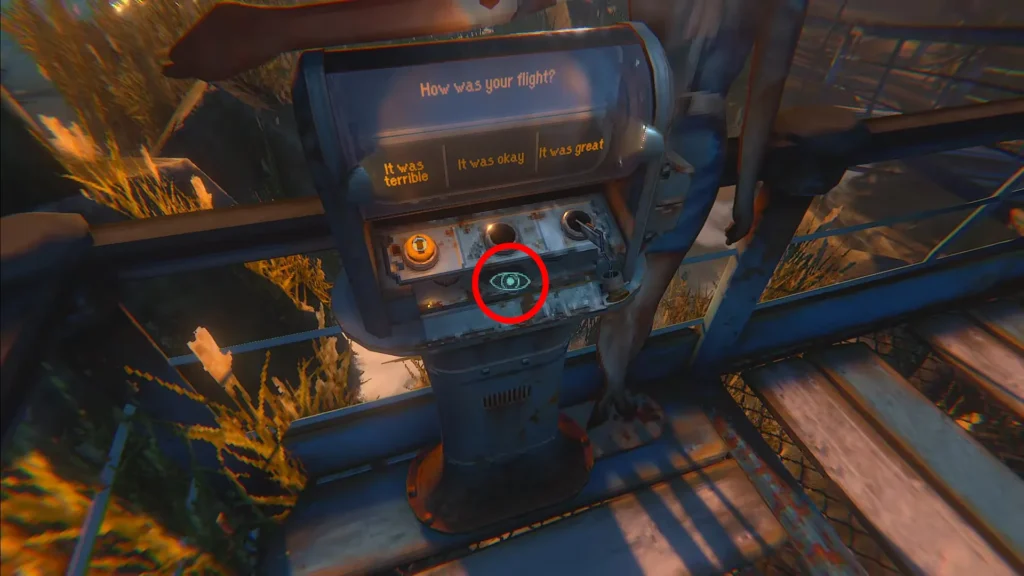
You need to swap the wire socket before answering each question so the correct button is active:
- “How was your flight?” — Move the wire to socket 2, answer “It was okay”
- “Select the image with traffic lights!” — Move to socket 1, select the traffic light image
- “Which one of these activities is encouraged on Dimhaven?” — Move to socket 3, select “Sightseeing”
- “Select the picture featuring a date!” — Any socket works, all images show dates in some context
- The garbled math question — Move to socket 2, select the answer marked “THIS ONE”
- “Would you recommend our services?” — Move to socket 1, select “Sure, it was great”
After this, collect your visa application ticket and go through the gate. Remember to pick the ticket back up from the lock after using it.
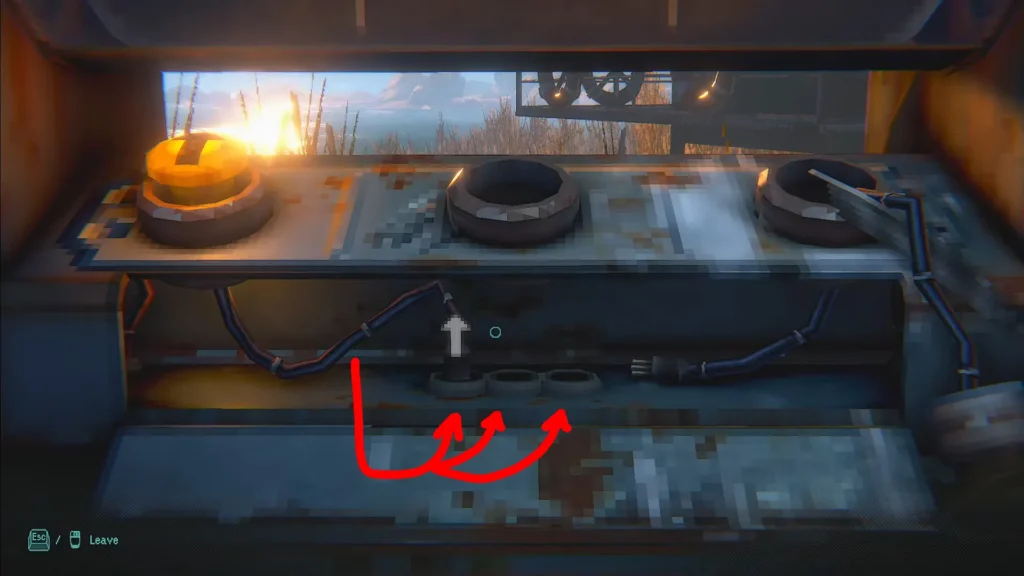
Toolbox Code
A note inside the Visa Office mentions a toolbox near the sink behind the building. The note says the combination is: Right, Left, Left, Right, Right, Right, Left.
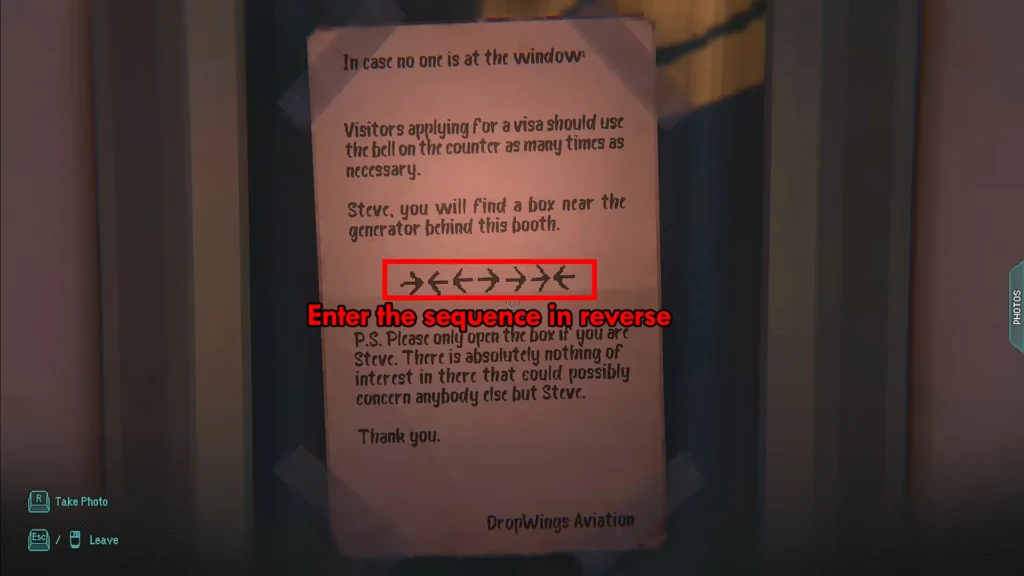
The catch: the toolbox is sitting upside-down on the sink. You have to enter the sequence in reverse directions. The correct input is:
Left, Right, Right, Left, Left, Left, Right
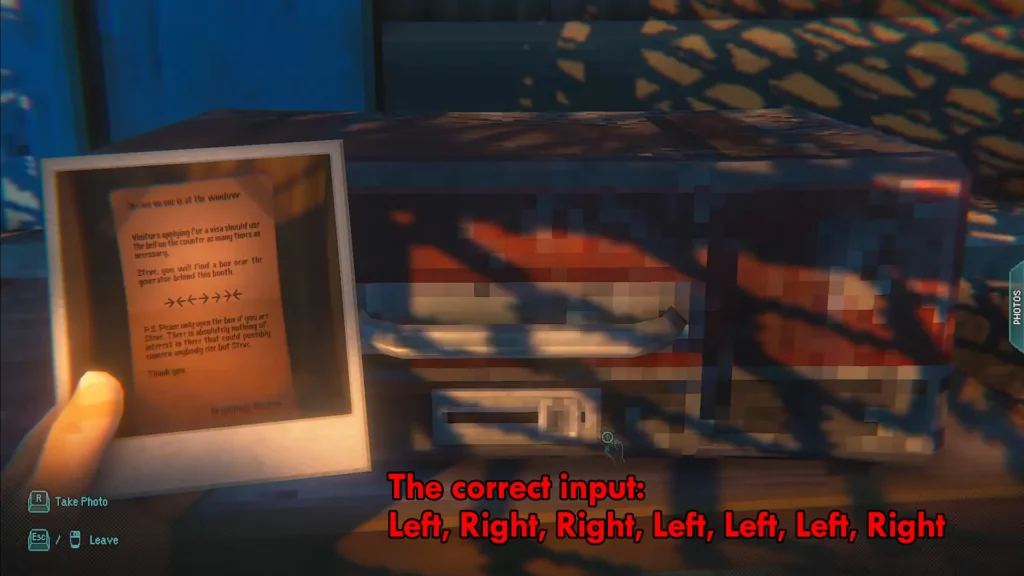
Inside you will find 100 Forints and a note from Matilda. The note tells you the key to the Visa Office is hidden under the mat at the office door.
Ambassadorial Lavatory Padlock
This is one of the more satisfying puzzles once the logic clicks. The notice inside Bay Tower tells you the lavatory code formula:
YYYY + DD + MM + WC Base Code
To find the values:
- Check the calendar inside the Visa Office. Pages stop after March. That tells you the employee stopped doing his duties after March 3rd, which was a Wednesday (the day the code resets).
- Work backward: the last Wednesday he actually changed the code was February 25, 1984.
- The WC Base Code is 3516, written on the noticeboard inside the Visa Office.
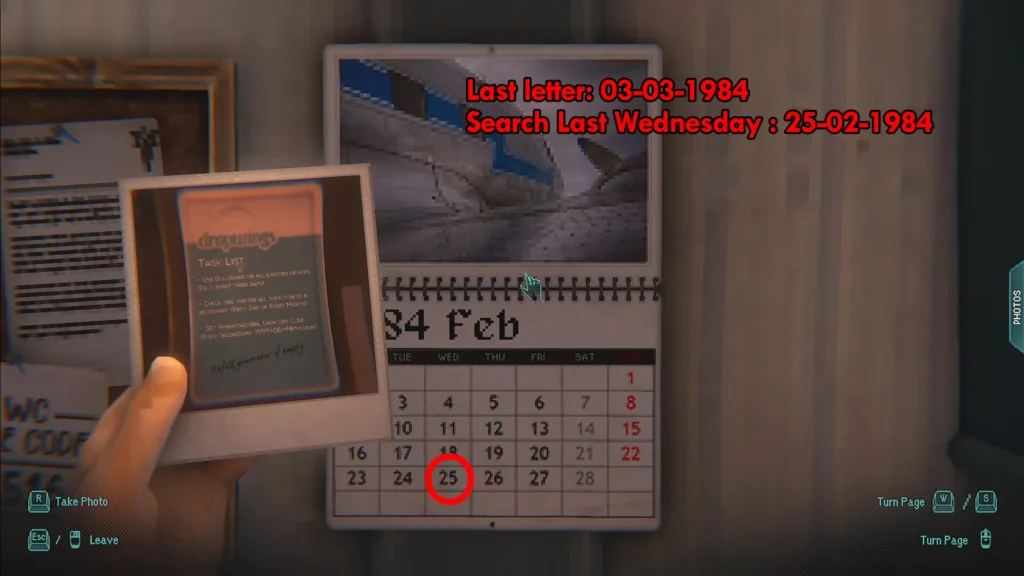
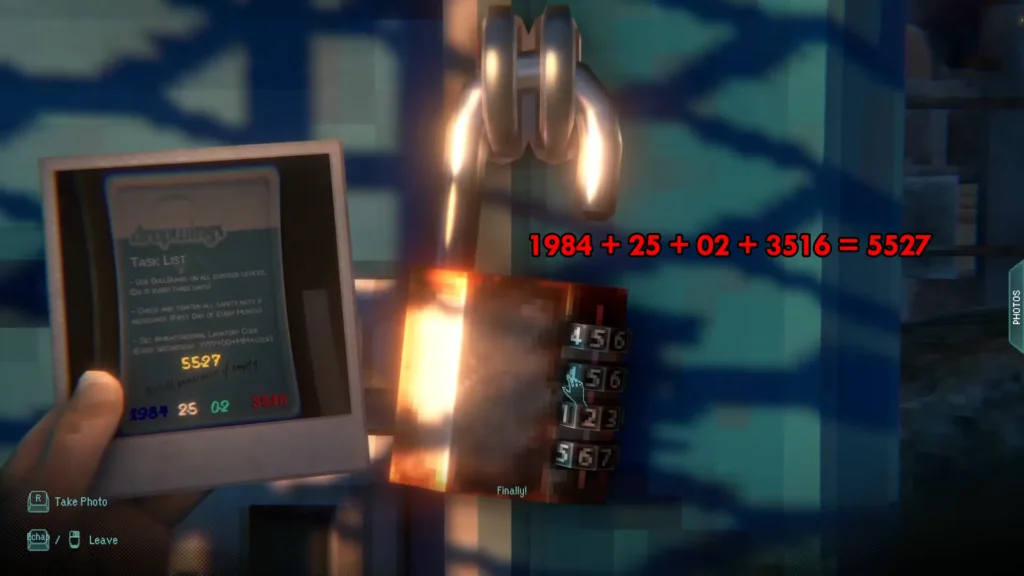
Now add them: 1984 + 25 + 02 + 3516 = 5527
Enter 5527 into the padlock on the Ambassadorial Lavatory. Inside, check the plaques on the walls — the last one has 50 Forints tucked behind it.
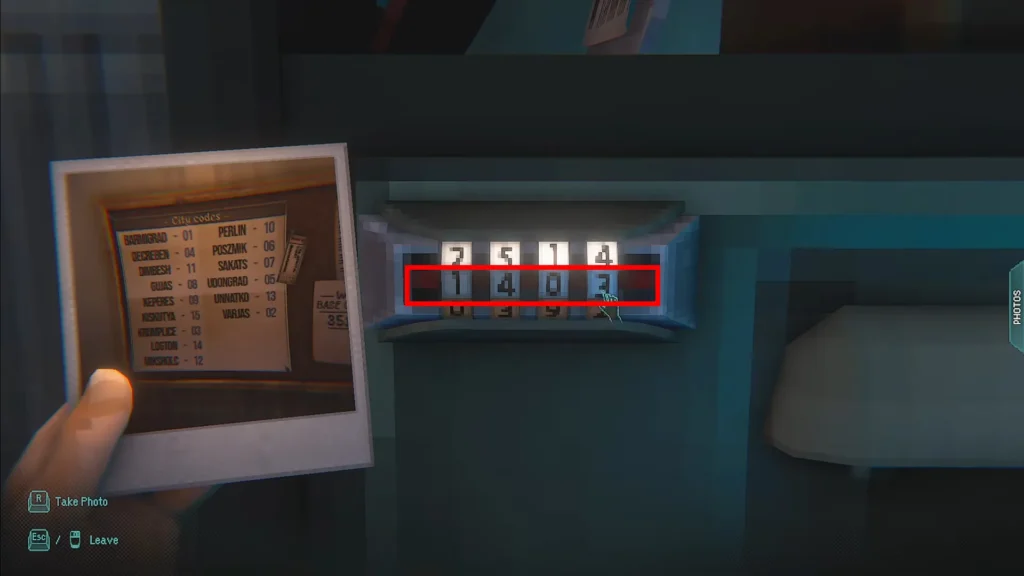
Filing Cabinet
The note you find on the coat hanging near the final visa checkpoint reads: “Miks-reben Var-natko”
These are fragments of city names listed on the noticeboard in the Visa Office. Match each fragment to its city and note the number beside it:
- Miks → Miksholc → 1
- Reben → Decreben → 4
- Var → Varjas → 0
- Natko → Unnatko → 3
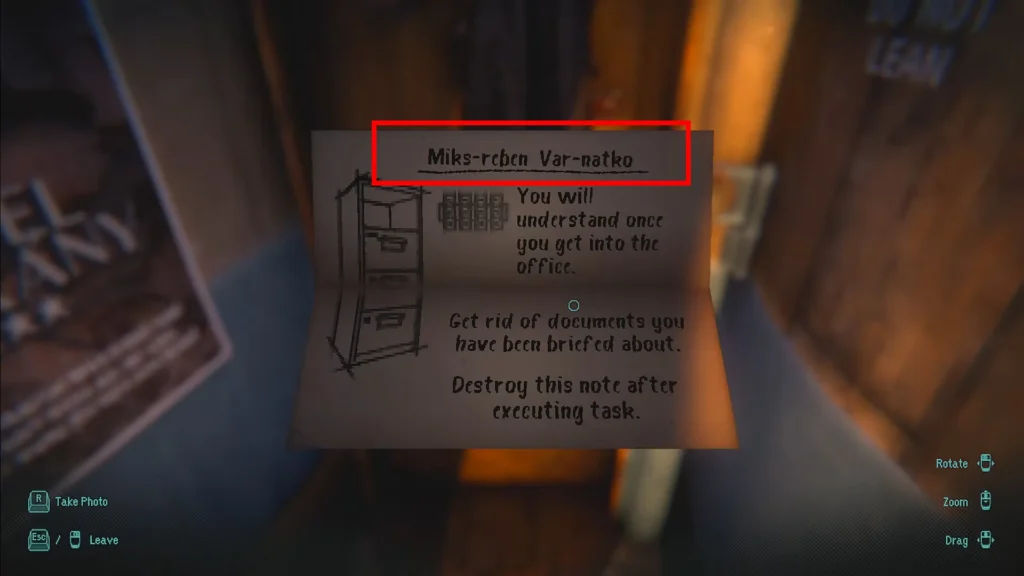
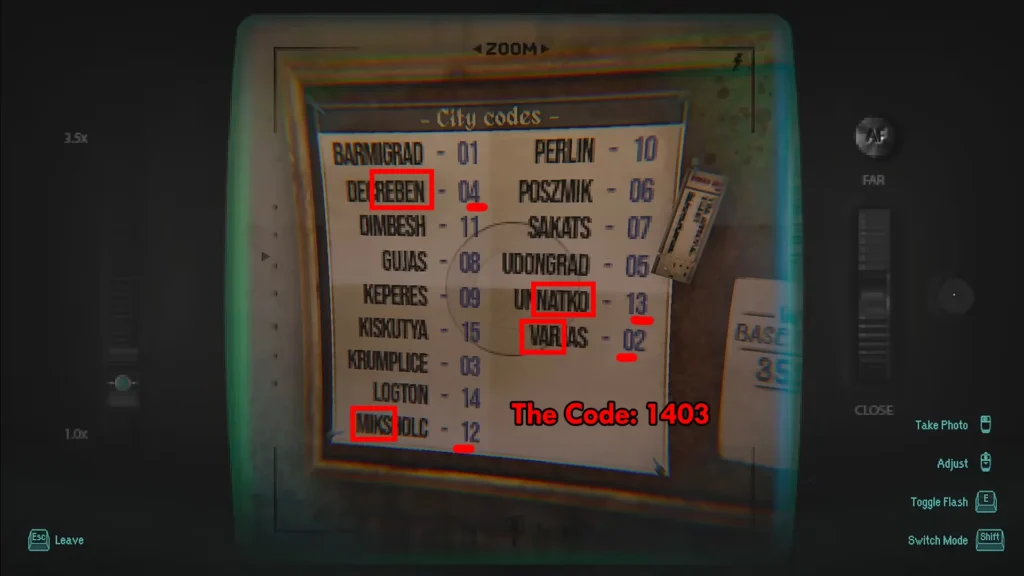
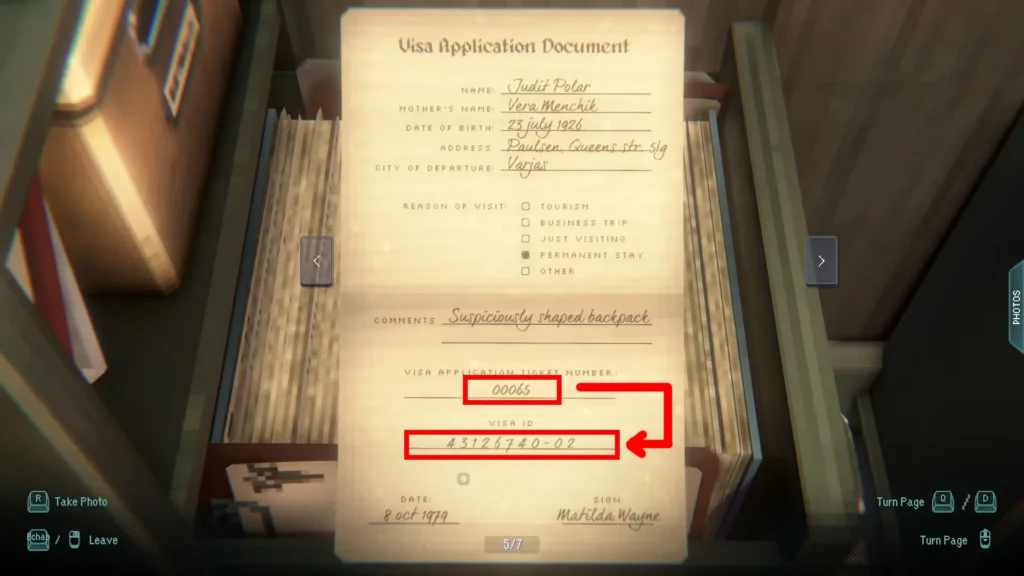
The code is 1403. Open the filing cabinet with this. In the top drawer, find a Visa Application Document, scroll to Judit Polar’s entry. Her Visa ID is 43126740-02. In the bottom drawer, collect the Typewriter Ribbon for the blue typewriter on the desk.
Visa Typewriter: Decoding the Perforated Ticket
This is one of the puzzles that trips people up most, and most walkthroughs just give you the answer without explaining the method. Here is how it actually works.
Your visa application ticket has a row of eight small boxes on the right side. Each box has a pattern of dots that represents a number. To decode them, you compare against reference tickets scattered around the office:
- Ticket #65 (on top of the boxes behind you) shows what the number 4 looks like as a dot pattern.
- Ticket #33 gives you the pattern for 8.
- Ticket #79 gives you the pattern for 5.
- Cross-reference Judit Polar’s known Visa ID (43126740) against her ticket to map out additional numbers.
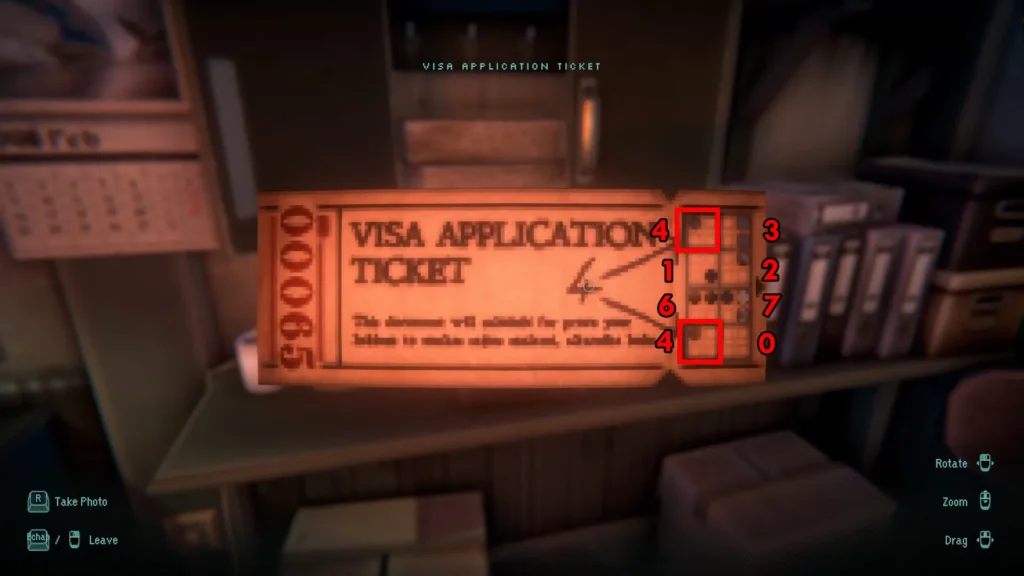
Once you decode all eight boxes on your ticket, the number reads: 35856392
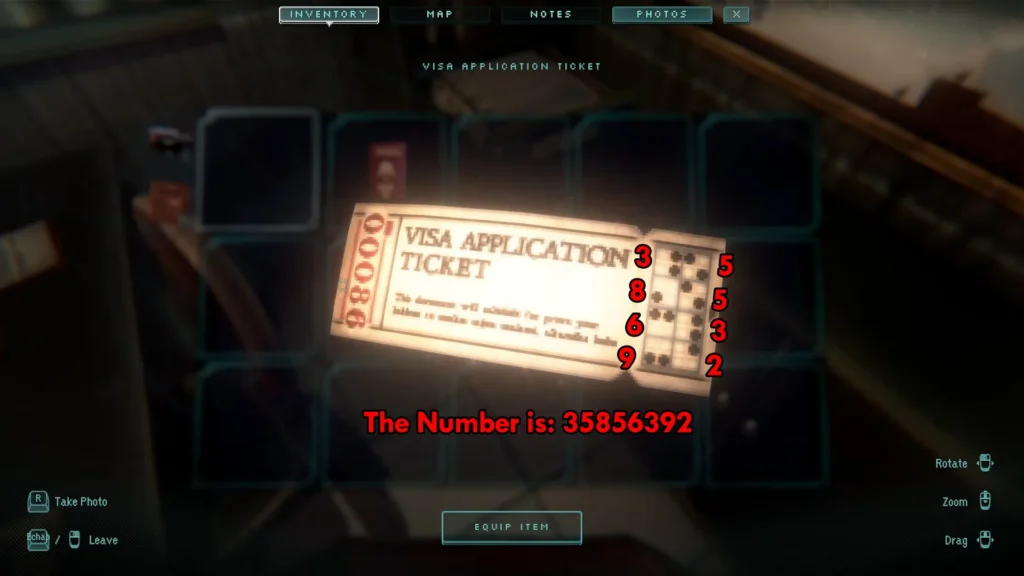
For the final two digits (the departure city code), open your passport. Emily is from Udongrad, which has the city code 05.
Type 35856392-05 into the blue typewriter. Retrieve the printed visa. Go to the final checkpoint, insert your passport into slot 1, sit for the photo, then insert your Application Ticket into slot 3 and your printed Visa into slot 4. The gate opens.
Kishvar Puzzles
Kishvar is where the game gets mechanically dense. The workshop, the hotel, and the cable car station are all connected and solving one puzzle usually unlocks the next area or gives you a component you need somewhere else.
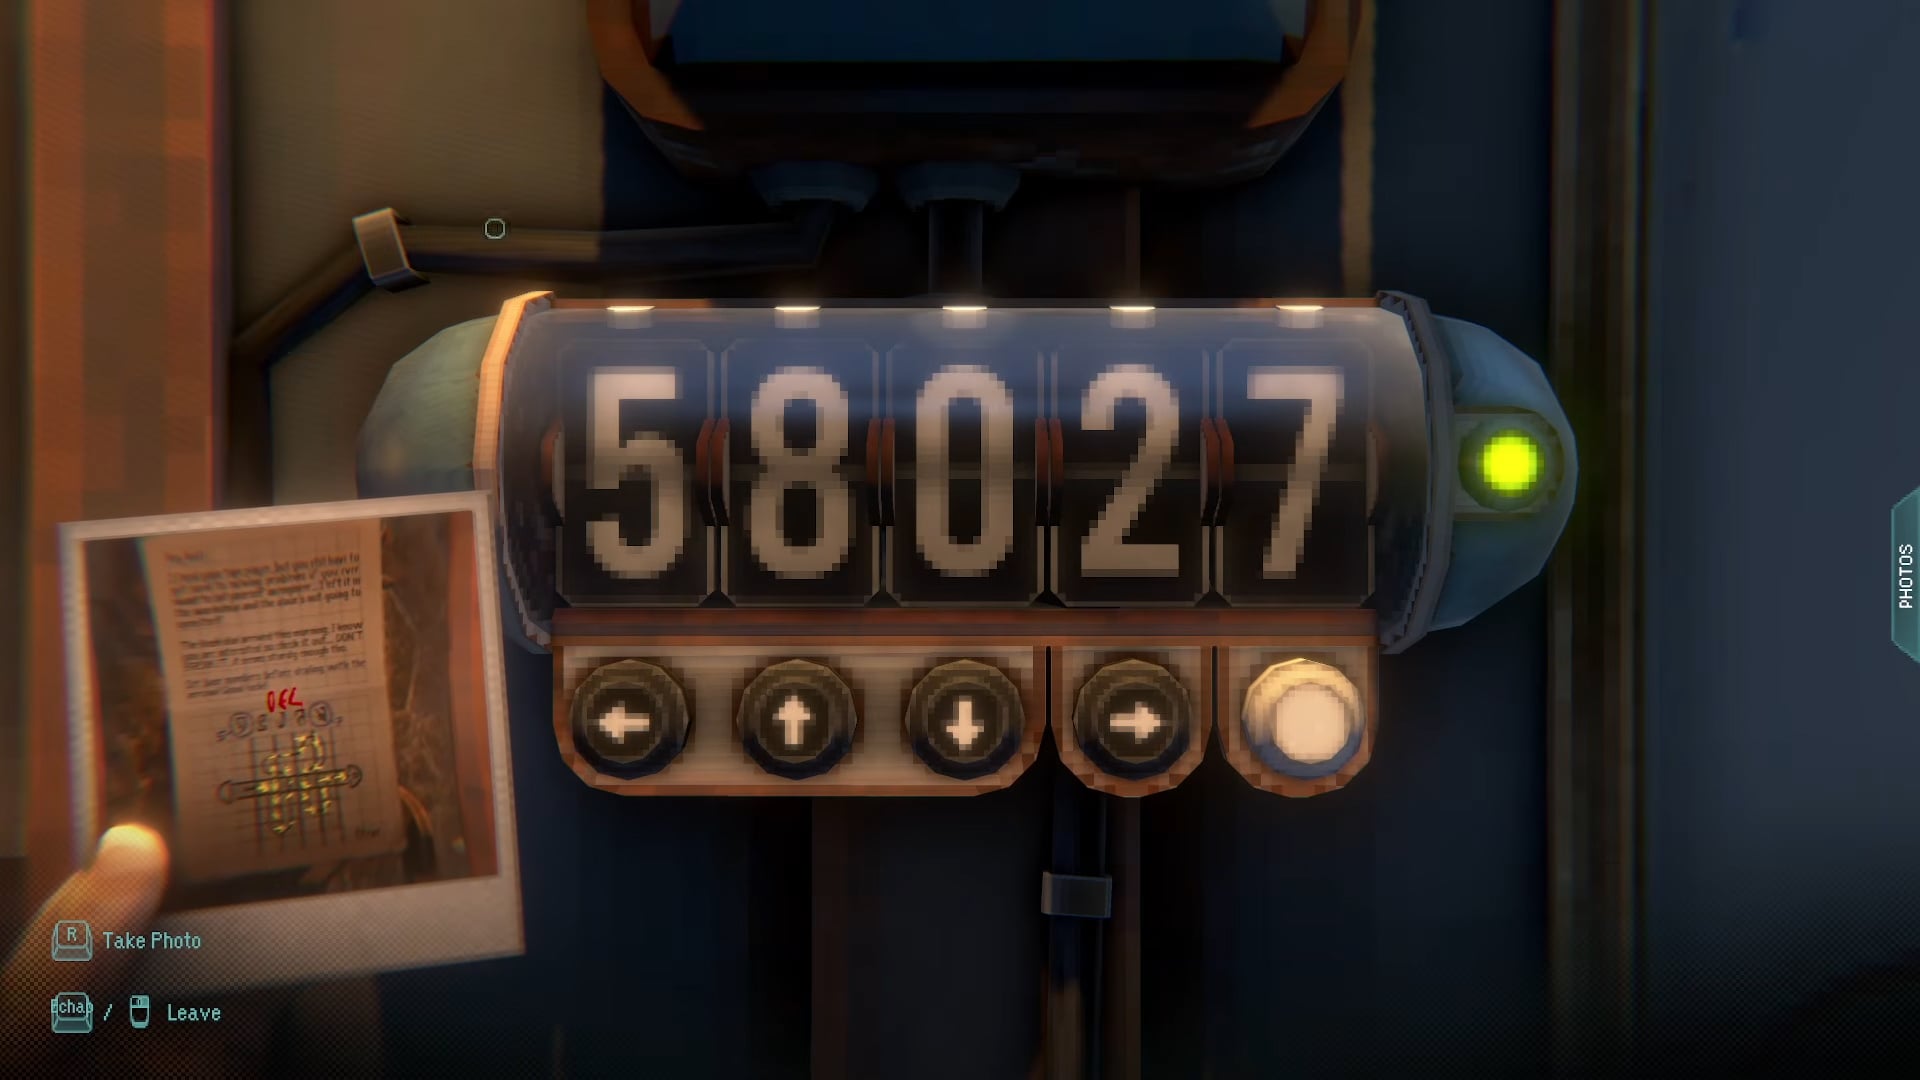
Workshop Dial (Vosh Dial)
The note on the wall of the workshop gives you only two numbers to start: 5 and 7. These are the first and last digits of a five-digit code, and your job is to figure out the three digits in between.
Step 1: Use the note to identify the symbols for 5 and 7. Pick up the artifact sitting on the desk and find those two symbols.
Step 2: Learn the full symbol-to-number mapping from the artifact. It shows all ten symbols arranged in order (0 through 9). Now that you know which symbol is 5 and which is 7 from the previous step, you can orient yourself on the artifact and read off every other symbol’s number.
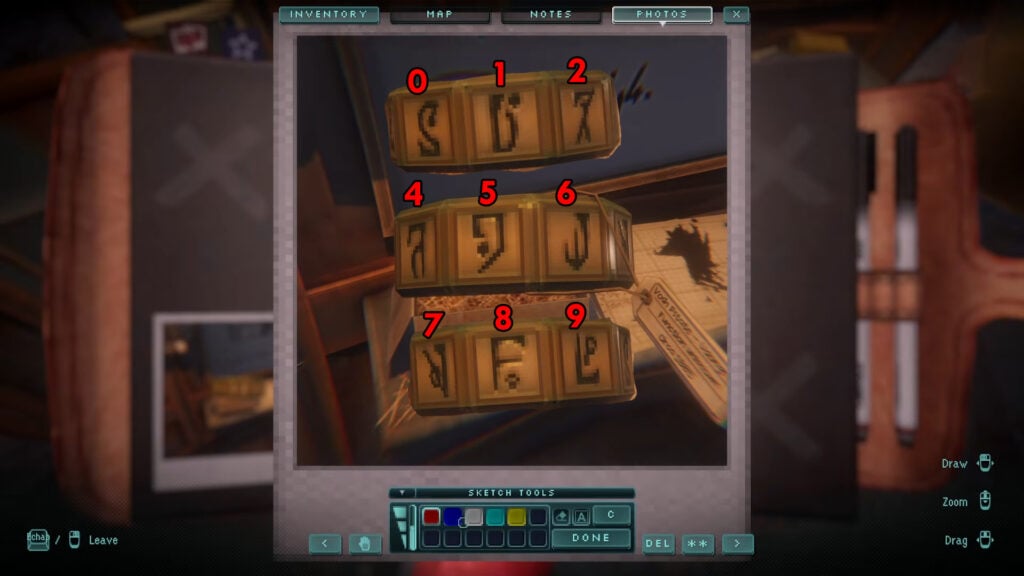
Step 3: Read the three unknown digits. Look at the three symbols sitting between the 5-symbol and the 7-symbol. Use your key from the artifact to translate each one. They read: 0, 6, 4.
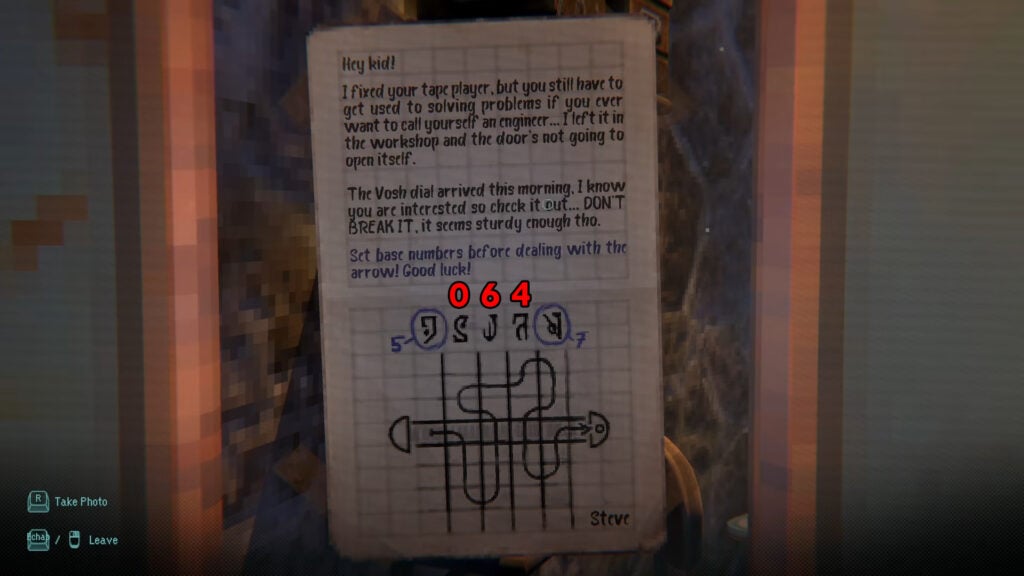
The note says: “Set the base numbers before dealing with the arrow.”
This is a two-step process. First, dial in the base numbers you got. Then, the arrows on the note tell you to adjust dials up or down:
After applying all the arrow adjustments, the final five-digit code is 5-8-0-2-7.

Enter this into the office door lock. Inside you will find the CMP Unit and the instruction manual. Photograph both, you will need them.
Circuit A: CMP Units
The instruction manual from the workshop office lists specific rules for placing the CMP units. For the first Circuit A setup, you have a 2-3 L (long corner piece) and a 1-3 S (long straight piece):
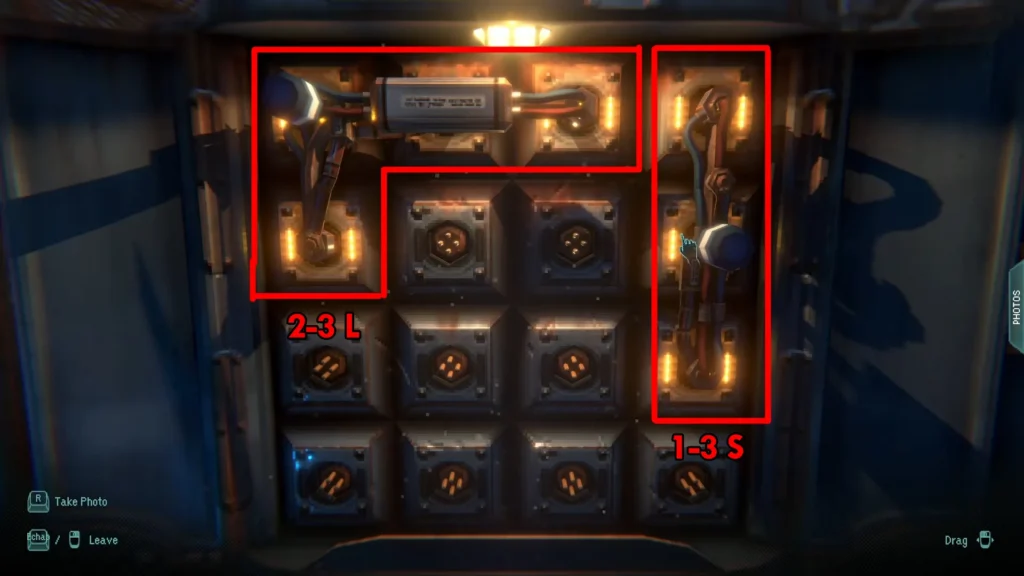
After you collect more CMP units from the museum elevator shaft and the elevator top, the full Circuit A solution is:
| Unit | Placement |
|---|---|
| 2-3 L (long corner) | Top left corner |
| 1-3 S (long straight) | Second row |
| 1-2 S (short straight) | Third row, center |
| 1-1 S (single circuit) | Top right corner |
| 2-2 L (curved corner) | Bottom right corner |
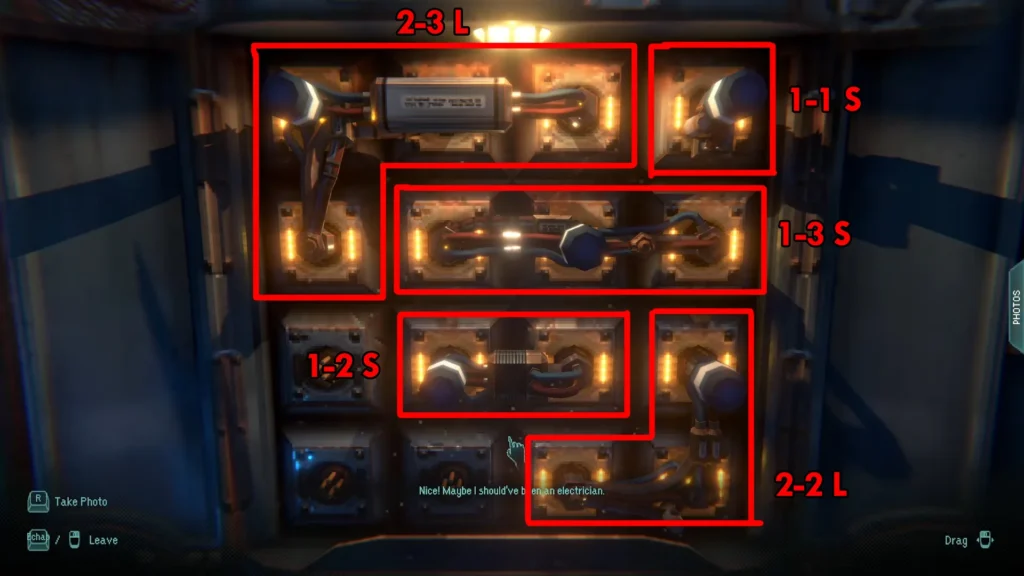
This increases the power output enough to use the elevator.
Fuse Box: Hotel Sarkany (Code: This is Marvelous Achievement)
After collecting fuses from the workshop elevator shaft and the museum hatch, you have enough to fill the fuse box below Hotel Sarkany. The note from the workshop office gives you most of the rotations:
- Top right → turned left
- Middle right → turned left
- Bottom right → turned left
- Bottom left → turned down
For the remaining fuses, plug the wire into the right socket at the top first, then rotate until all fuses are lit:
- Top left → turned diagonally down-right
- Middle left → turned down
- Bottom middle → turned diagonally up-right
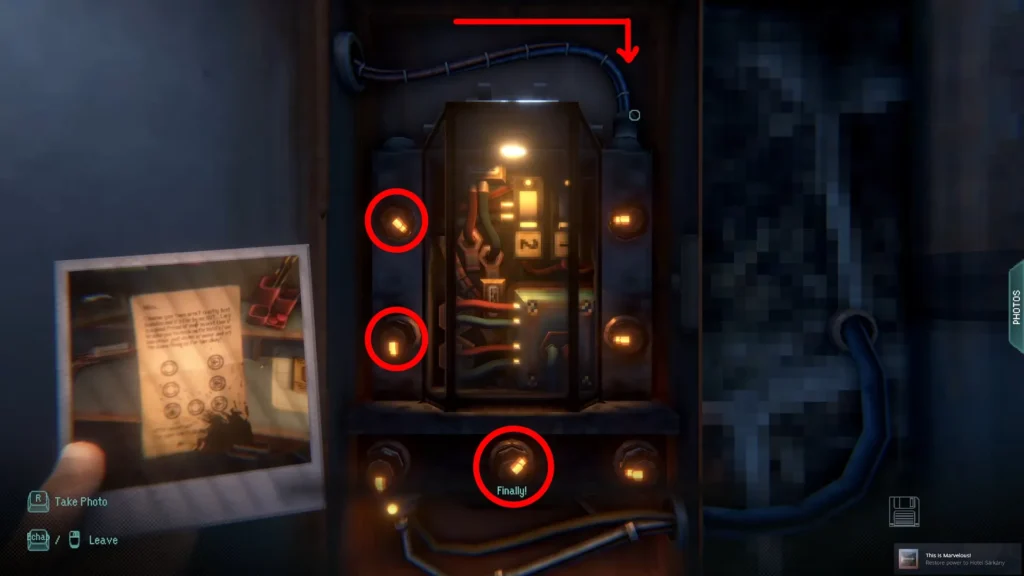
When all fuses are active, report back to Lars at the hotel window. He gives you the key to the bike lock. Take the chain to the red valve marked B, place it in the gears to the left of the valve, then turn the valve on. This powers Circuit B.
Circuit B: Wrench Puzzle
This puzzle has more Steam discussion threads than any other in Dimhaven, and for good reason. The notation on the distribution board is genuinely unusual.
The control panel shows: 1,3.4.2,1.2.3.3,3.4.4,2.
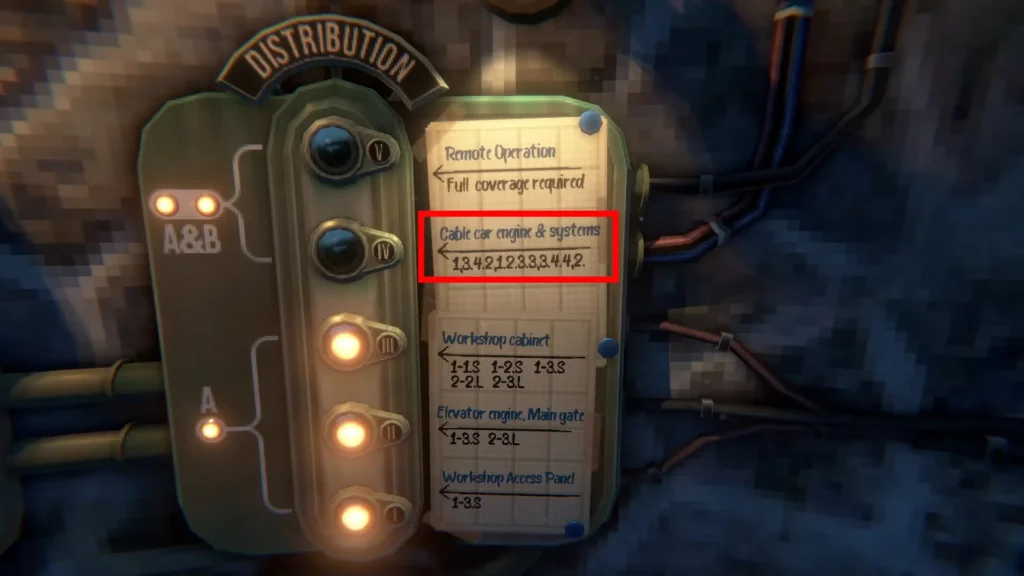
Here is how to read it:
A comma signals a new row number. A period separates column numbers within that row. So the notation breaks down as:
- Row 1: columns 3 and 4
- Row 2: columns 1, 2, and 3
- Row 3: columns 3 and 4
- Row 4: column 2
Place your wrenches at exactly those grid positions.
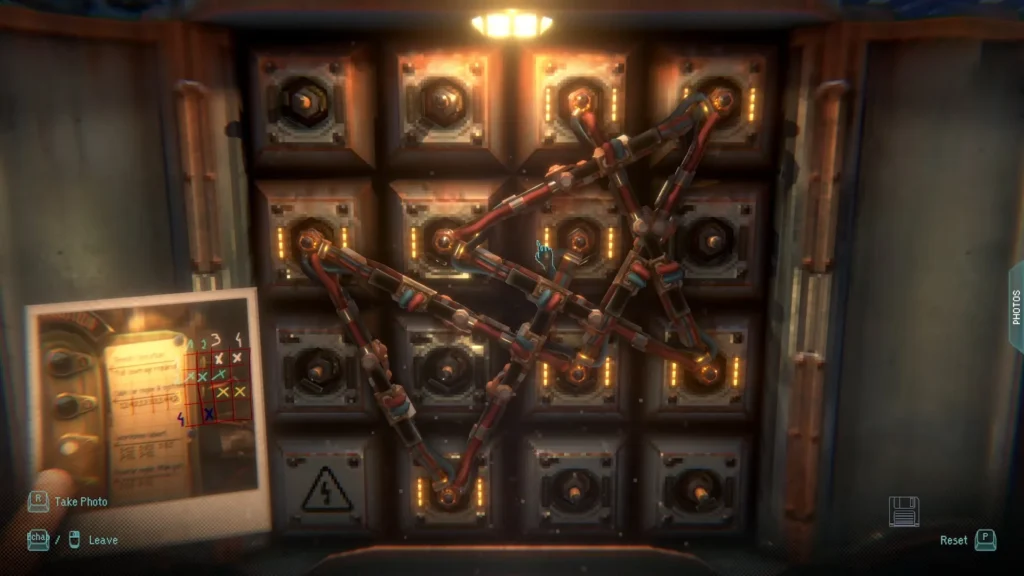
Note: Ignore the whiteboard in this area. It contains crossed-out incorrect attempts and teacher corrections. The circled numbers are marking errors, not answers. The only documents you need are the slip from the workshop drawer and the distribution board itself.
Once the grid is set correctly, the cable car gets power and you can ride it up to the mansion area.
Zack’s Mansion Puzzles
The mansion holds the most complex puzzles in the game, and several of them are connected to each other. Items and clues found in one room are often the key to a puzzle in a completely different part of the building, so keep notes and do not discard anything.
JadeHawk Game: Collector’s Box
The collector’s box on the shelf in Zack’s room has a five-digit padlock. The Jade Hawk poster on the table gives you the key: the code comes from counting specific enemies in Level 1 of the JadeHawk game on the console.
How to count without dying: A letter in Zack’s desk explains there is a bug in the game. If you park your ship in the bottom left corner of the screen, you cannot die. This lets you count at your own pace.
Enemy counts in Level 1:
| Enemy Type | Count |
|---|---|
| Circle cubes (yellow squares) | 12 |
| Pink ships with rounded fronts (moon ships) | 10 |
| X cubes (purple blocks) | 4 |
The padlock code is 12104. Open the box to get the strange key that raises the hidden staircase.
Achievement note: There is an achievement called “True Zadbox Master” for completing Level 1 without using the bottom-left bug. It is doable but requires real patience with the old-school difficulty.
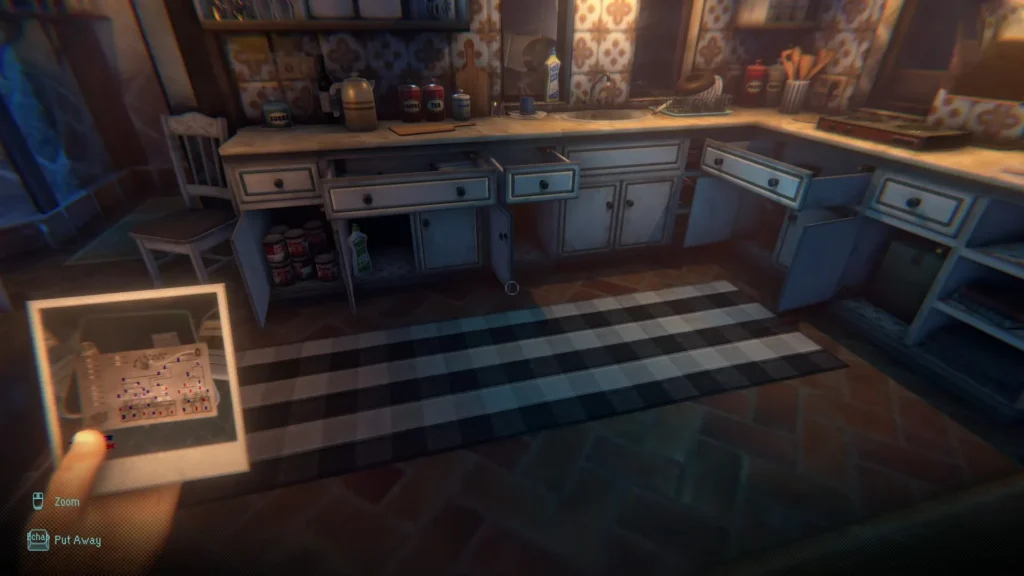
Kitchen Cabinet Circuit Puzzle
This puzzle has generated significant debate about whether open equals 1 or open equals 0. The developer confirmed in the Steam forums that closed = 0 (default state) and open = 1.
The blueprint you find in the hidden room upstairs shows which cabinets need to be opened. Follow the lines from the top right corner downward to trace the circuit path. Cabinets with electric pegs inside need to be opened. The full list:
- Left end bottom
- Left long top
- Left bottom double – left side
- Left small top
- Left single bottom
- Right long inner corner top
- Right inner corner double – left side
- Right end single bottom
- Wall cabinet right inner corner
- Both stove tops (if only one turns on, use the wall switch next to the stove and toggle it off and on)
- Light switch through the gate left of the microwave → turn OFF
- Light switch to the right of the doorway into Zack’s room → turn OFF
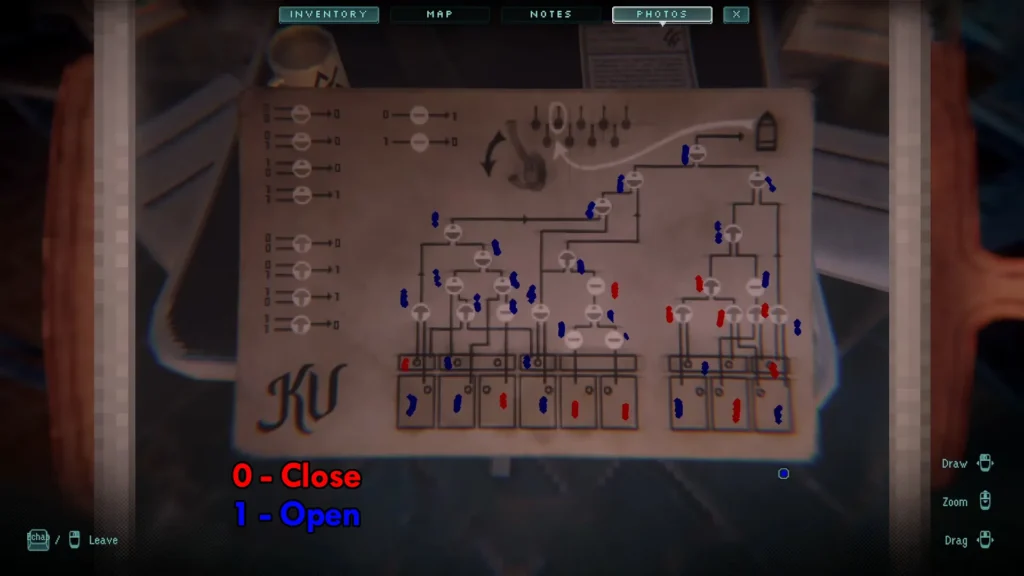
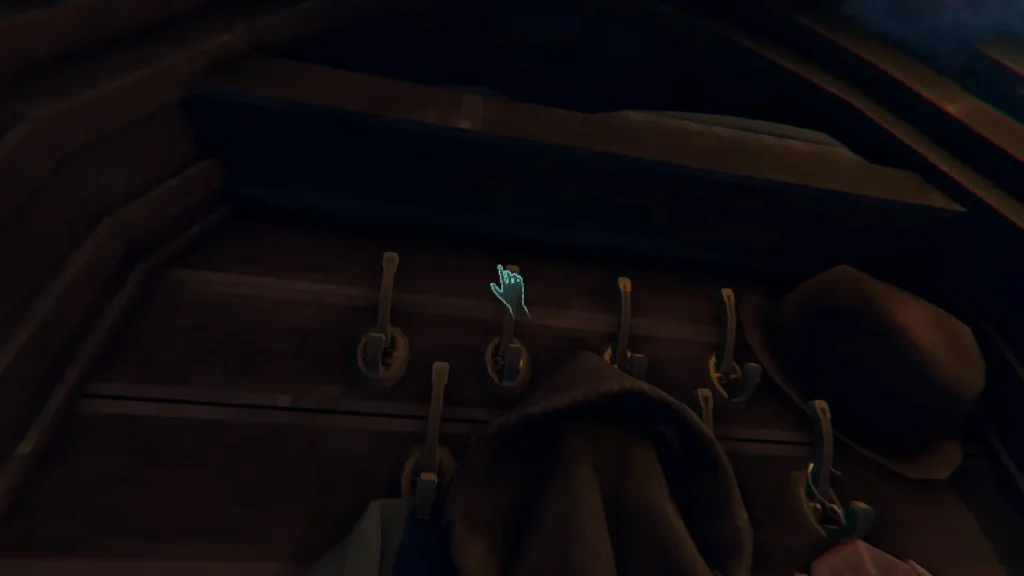
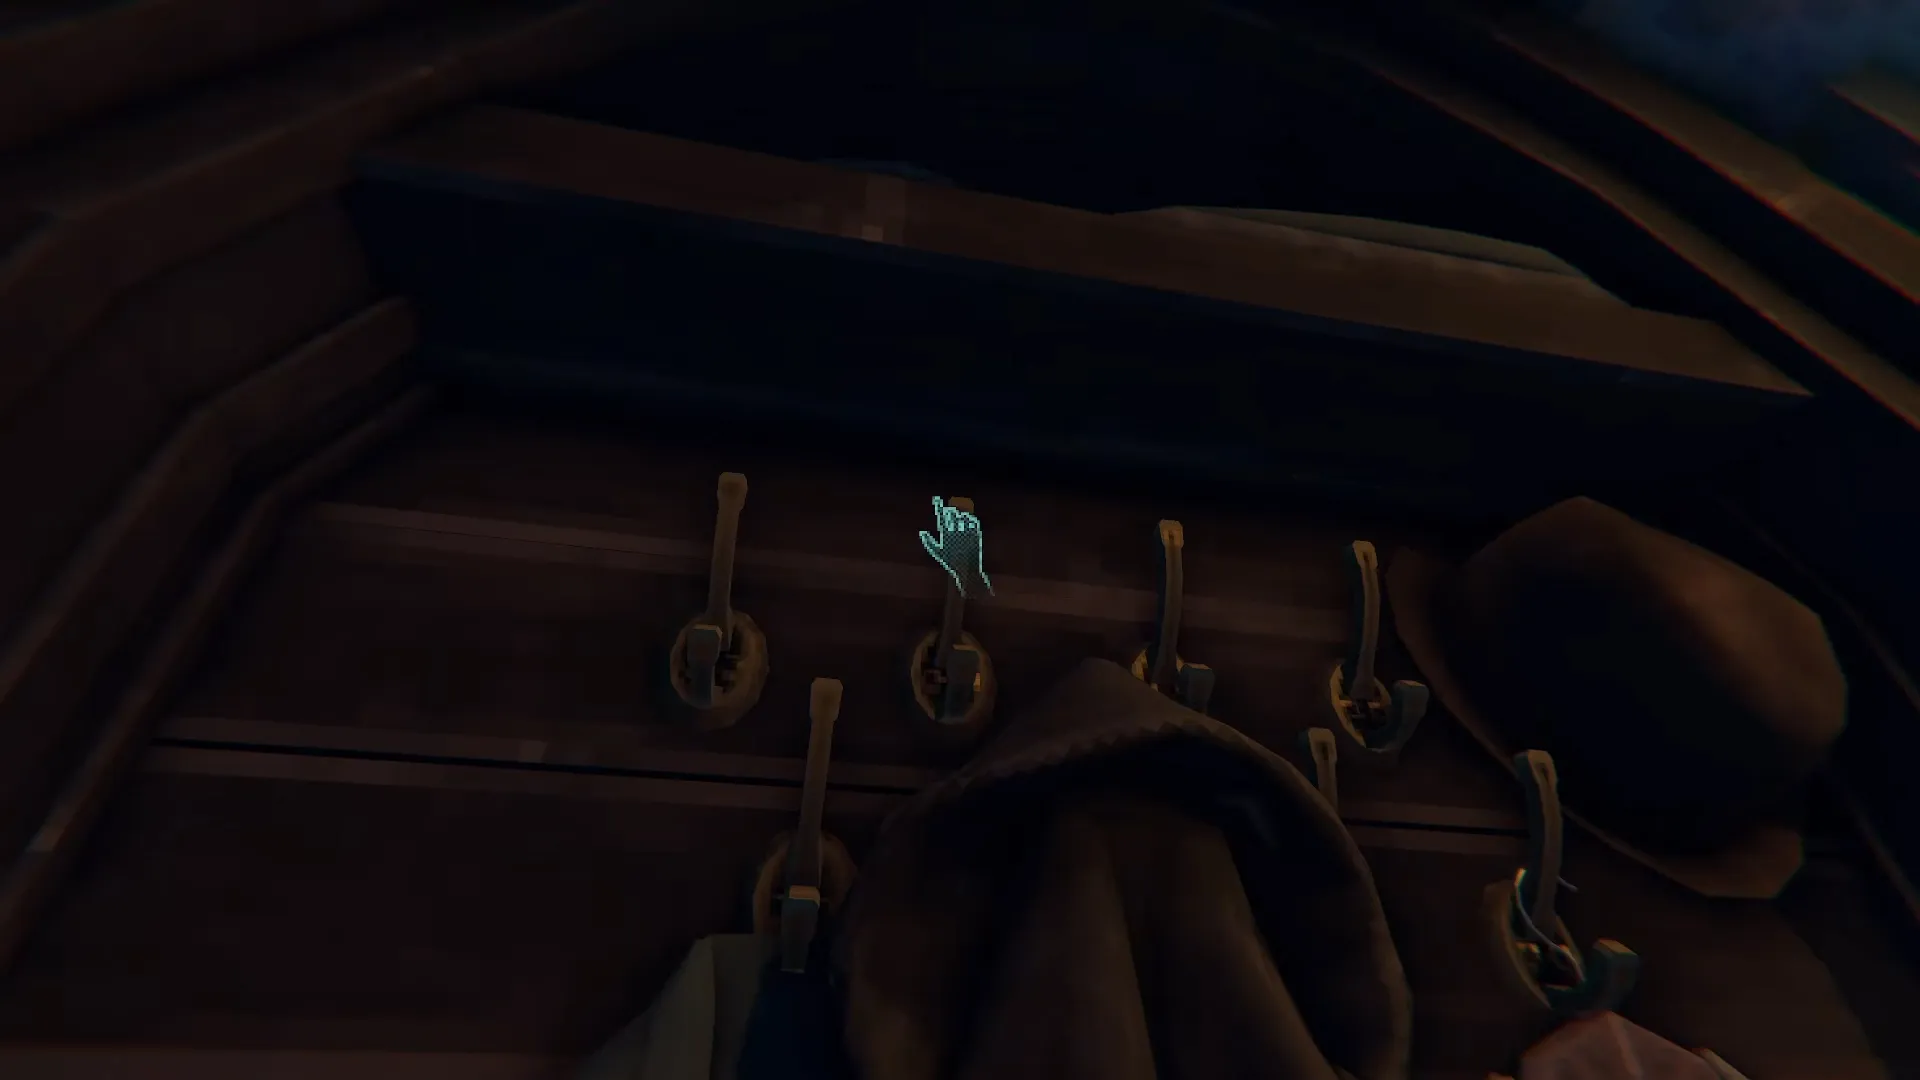
Once all of this is set, go to the coat rack and pull the hanger. If the configuration is correct, a hidden door opens.
General Tips for Dimhaven Puzzles
Quicksave constantly. Press F5 to quicksave at any time. The game autosaves at checkpoints (look for the floppy disk icon in the bottom right), but those are infrequent. Before attempting any multi-step puzzle, save manually.
Use your camera as a notebook. You can photograph clue items and refer back to them in your photo roll. When you find a code, a diagram, or a map, photograph it immediately. The sketch tool lets you annotate photos, though be aware of a current bug where sketches can shift slightly out of alignment with the underlying photo.
Hard of Hearing Mode helps beyond the elevator puzzle. Several environmental audio cues are easier to catch with this mode on, including subtle feedback sounds when puzzle elements are positioned correctly.
The hint system is in your inventory. If you are stuck, open your notes (press N) and look for the hint option. The first hint is always vague, but subsequent hints get more specific. Using hints does not affect achievements.

